Introduction
This guide is a general overview of how to use and configure the imDocShare SPFx Web Parts designed for SharePoint Online, and SharePoint on-Prem for 2016 and later. It is important to note that the SharePoint framework (SPFx) is not compatible with SharePoint environments older than SharePoint 2016. Specifically, SPFx requires the “Feature Pack 2” update which comes with SharePoint 2016.
If you would like to use imDocShare WebParts for SharePoint 2013 on-Prem environment, we provide a different Visual Webpart solution that has the correct compatibility to support older environments. This documentation also does NOT cover the installation and usage of imDocShare on Microsoft Teams, please consult our documentation for the Teams App for more info.
imDocShare WebParts can be configured and customized in several ways to show the most appropriate documents and containers for a respective user or situation. These Web Parts include*:
- Normal View
- RecentDocs View
- Search Folder View
- Favorites View
*On-Premises deployments will instead come with a universal Doc Viewer webpart which can be converted into all the above webparts by changing the webpart configuration.
Classic vs Modern pages – imDocShare WebParts can be used on both classic and modern pages. This guide mostly focuses on classic but has several sections that feature modern screenshots prominently. Please look for sections entitled “Classic vs Modern”, which should be at the end of every section of instructions.
This is not a guide for deploying the SPFx WebParts to SharePoint. This documentation assumes that an Admin user has already deployed the SPFx project into the Site Collection’s App Catalog and the webparts are ready to use. If you need help with deployment, please see our documentation entitled “imDocShare SPFx Webparts Deployment Guide”.
Note: Site Collection Libraries MUST be able to host JSON and JS files or else deployment will fail. Any security measures that block Popups or iFrames must be turned off as our authentication uses these resources. Please see the auth section for an alternative workaround which uses ‘redirect’ authentication.
Supported Browsers
Supported Browsers:
- Microsoft Edge
- Google Chrome (latest released version)
- Mozilla Firefox (latest released version plus immediate previous version)
- Apple Safari (latest released version)
- Internet Explorer 11 (limited support only. IE11 Protected Mode is not supported)
Not Supported Browsers:
- Internet Explorer 10
- Internet Explorer 9
- Internet Explorer 8
- Internet Explorer 7
- Internet Explorer 6
imDocShare Licensing
imDocShare comes with a unique license ID which will be verified on load. If you receive a message saying “Invalid License” this means that the App was able to load successfully but it was not able to retrieve your licensing info.
When receiving our imDocShare deployment materials, you should also have received a imDocShare LicenseKey.txt file. This file contains your unique key which will activate imDocShare and the specific features that you have requested. In order to activate, simply drop the key file, which we have provided, into the library where our assets were deployed. Neglecting this step will yield licensing errors and will not allow usage of the app.
For Sharepoint Online:
https://{your-tenant}.sharepoint.com/sites/AppCatalog/ClientSideAssets/{webpartGUID}/
For Sharepoint On-Premises:
https://{yourSharepointTenant}/SiteAssets/imDocShare/CDN/assets/images/folderIcons/
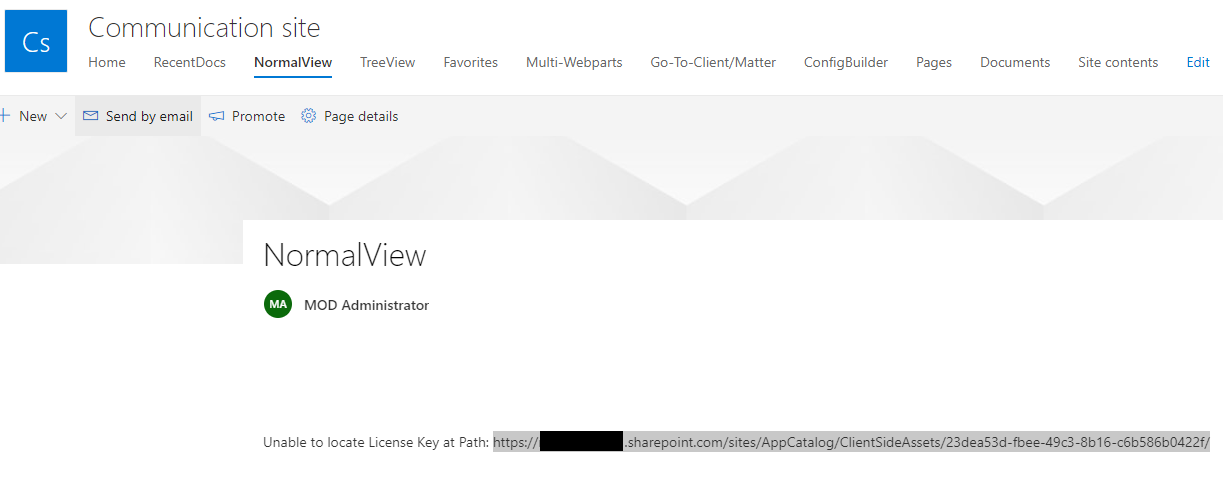
Attempting to use the app without putting in the license key will be able to yield the exact path in an error message similar to the one shown below:
imDocShare WebParts Global Features
All the WebParts included in this project have a few global features that are common among components regardless of which view you are using:
The WebParts feature automatic authentication once a user has logged in once, in the same browser. This state will last for the length of your token expiration, which can be set in your application settings on iManage. Authenticated users can query any documents or source locations that they have permission to access on iManage. Users are also able to execute actions that make changes to the documents, such as add/remove favorite or Uploading a new document to a location.
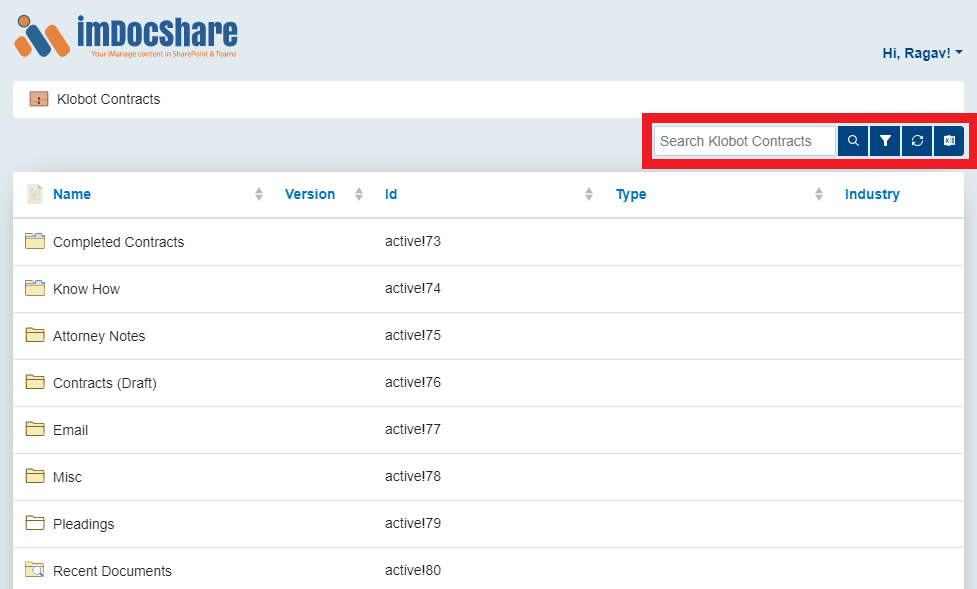
All WebParts feature a search bar in the top right corner, that can be used to filter through contents or search through all containers that are set as document sources. More about this feature can be found in the section on Search.
Documents and containers can be set as favorite. Favorited documents and containers will be displayed in the “Favorites” view.
All components have configurable table columns which you can include in the initial AppConfig Object. Column data is based on the standard and custom fields that exist on each iManage entity. These attributes are listed further below.
Documents can be sorted and reverse-sorted by clicking or double-clicking on the column property-title by which you want to sort.
All documents displayed in a WebPart, upon click, will (by default) open the document’s preview page which is powered by iManage. This default click behavior is customizable using your config options. Please see our section on config options to customize this behavior. There are a few different behaviors that users can select:
Clicking on any document will open the document in the iManage preview window
Clicking on any document will open the document’s page in the iManage.com website
This option will simply download the selected document on click
Search Features
Search is a global feature that exists on every WebPart. Search functionality will vary depending on the type of content that is retrieved by the WebPart. The search bar can be used as an API search that sends a query to the IManage API for matching content or metadata information.
Using API Search
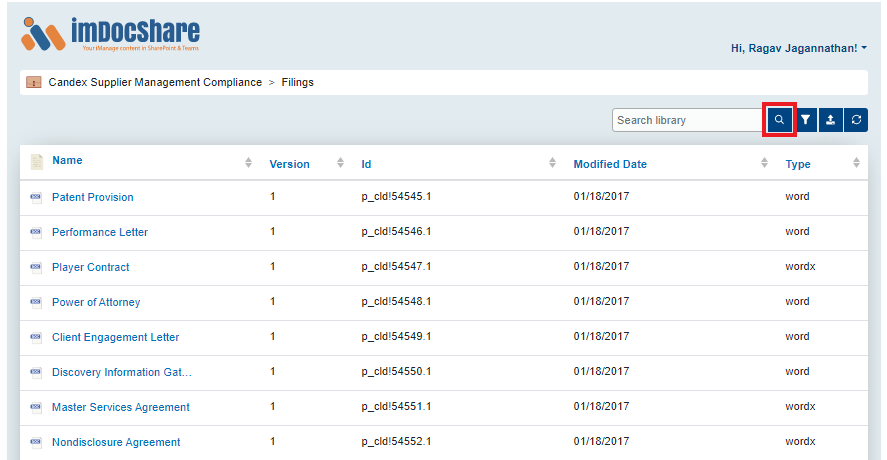
In cases where prominent subfolders exist, such as in workspaces with subfolders or in TreeView where there are multiple sources, the user will see a search button denoted by the standard magnifying glass icon.
When the user clicks the search button or presses enter with a search term, the WebPart will execute a query to iManage that searches through all containers and sub-containers that are contained within the primary container which contains the source location used. The current contents of the display table will then be replaced by the search results. Users can revert to the previous view by pressing the “x” button inside the search box.
Note: When using any type of search for on-Premises clients, please ensure that your iManage work server installation includes some type of indexer service. Typically, iManage provides a few different choices and this can be configured with the same installation materials used to install the iManage work server. Without an indexing service, any API search call will not return expected results. This can be mitigated by using wildcards on some specific field queries but overall search will be crippled without the indexer.
Filter Feature
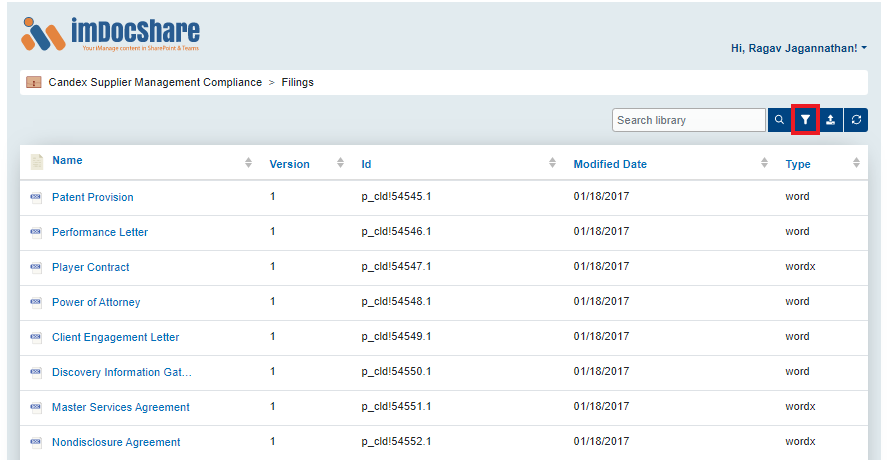
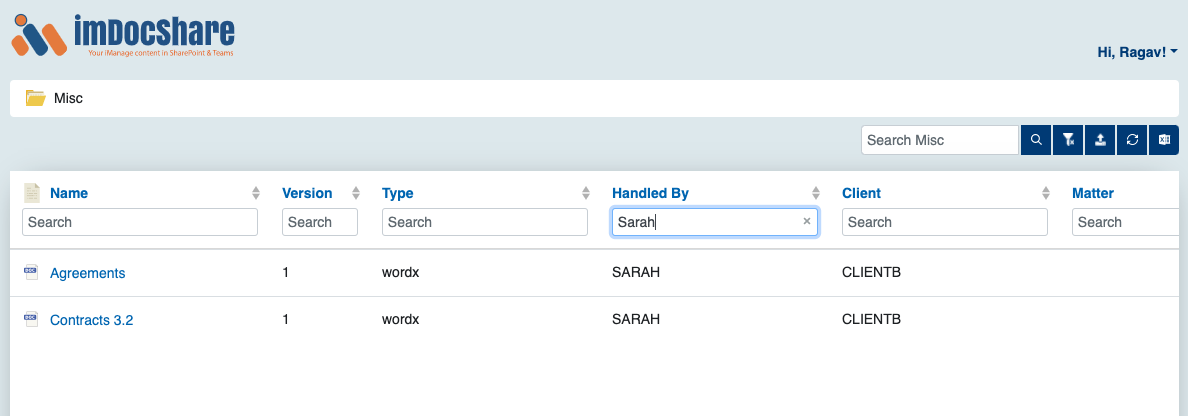
User can select the ‘filter icon’ to filter column data based on the current data being displayed in the table. Enter a filter query into any of the column fields and the view will update with current data that matches the query.
A user can end the filtering by either clicking the ‘x’ in the field where a filter query was entered, or by re-clicking the ‘filter icon.’
Upload Feature
Users can upload a new document into any WebPart which has a specific source location that is a container. For example: folders and workspaces are valid containers that one can upload to. Whereas, views such as RecentDocs or Favorites or Saved Search View are not valid containers and therefore cannot be uploaded to.
Simply click the upload button and it will open an upload dialog window. In this window, users can choose a file from their local machine to upload.
In TreeView, there are usually multiple sources displayed. In this case, the upload destination will be the latest workspace/folder/sub-folder selected by the user.
The uploaded documents will immediately be sent to your iManage repository barring any error happening. Users will be notified of any errors during upload. Please note that, even after successful upload, in some limited cases, the user’s view on imDocShare may not immediately update to show the newest upload. This is due to the fact that iManage processes and indexes the files in the background and the indexing priority tends to be lower for API uploads. This can be avoided by waiting a few minutes and refreshing the WebPart.
imDocShare Config Builder in SharePoint
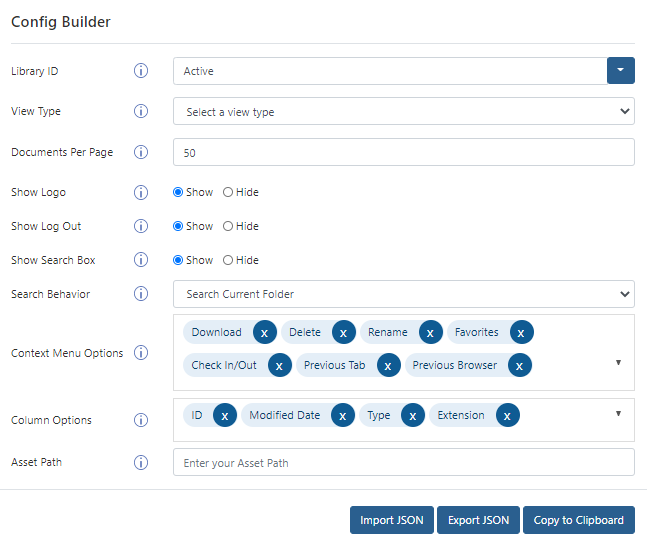
imDocShare Config Builder is one of our essential webparts when working with imDocShare for the first time. The Config Builder can be used to help create configs for all the other webparts
Note: More information about the Config Builder can be found in “How to use Config Builder”
Creating A Config Builder webpart
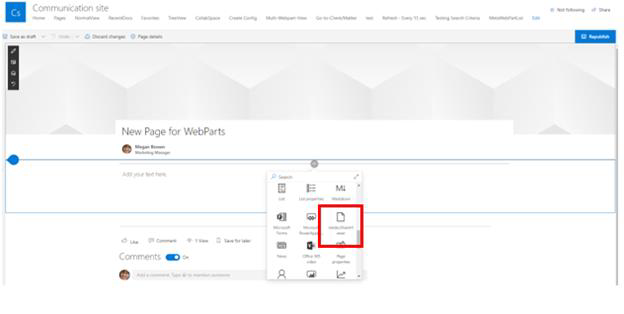
Create a new page or use existing Config Builder webpart.
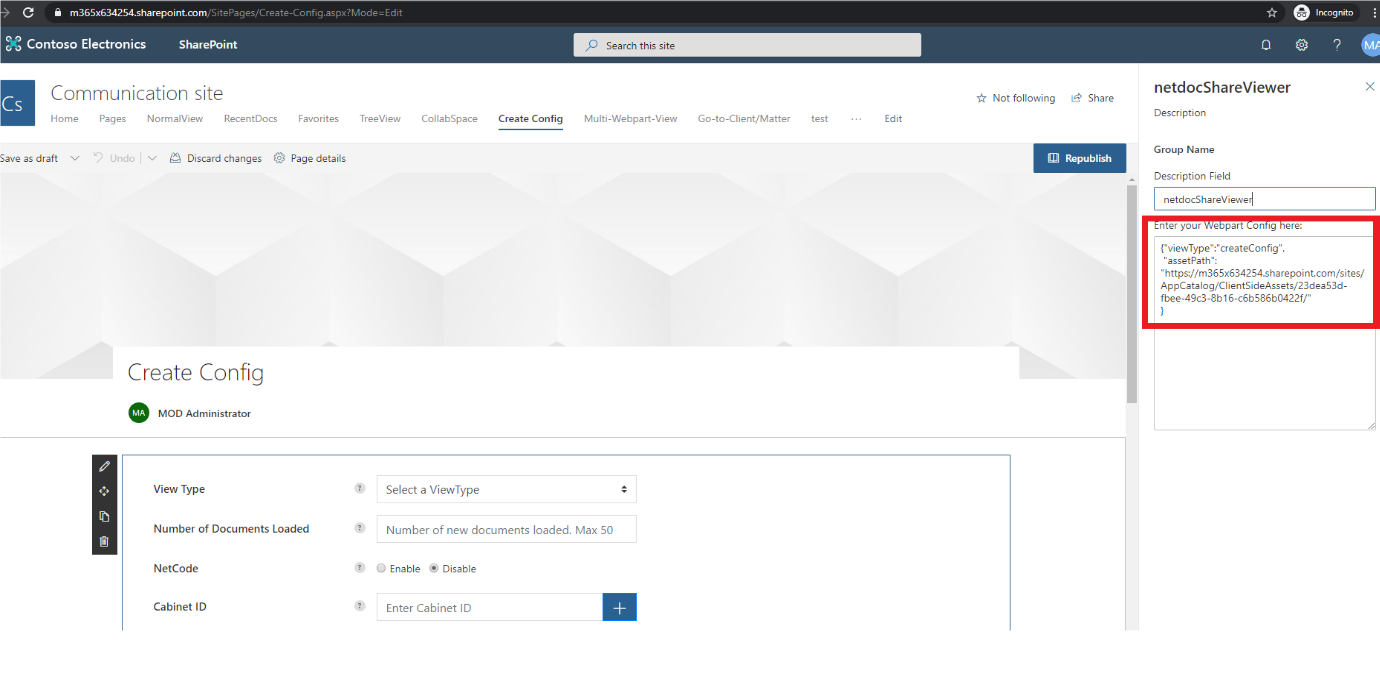
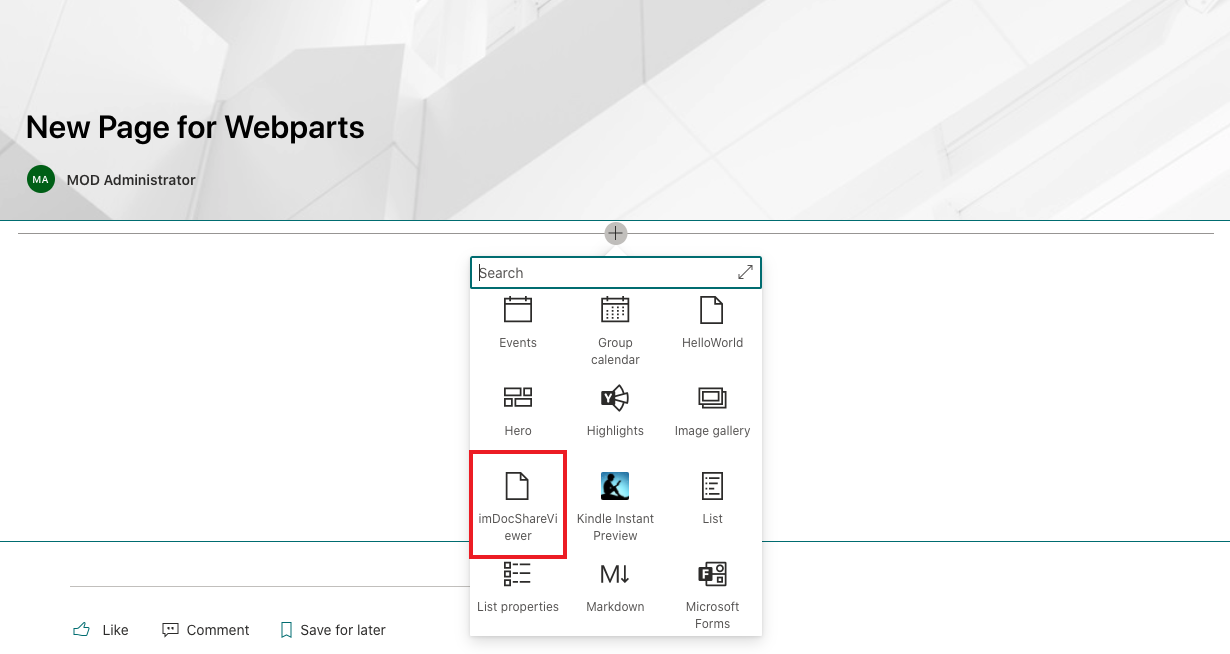
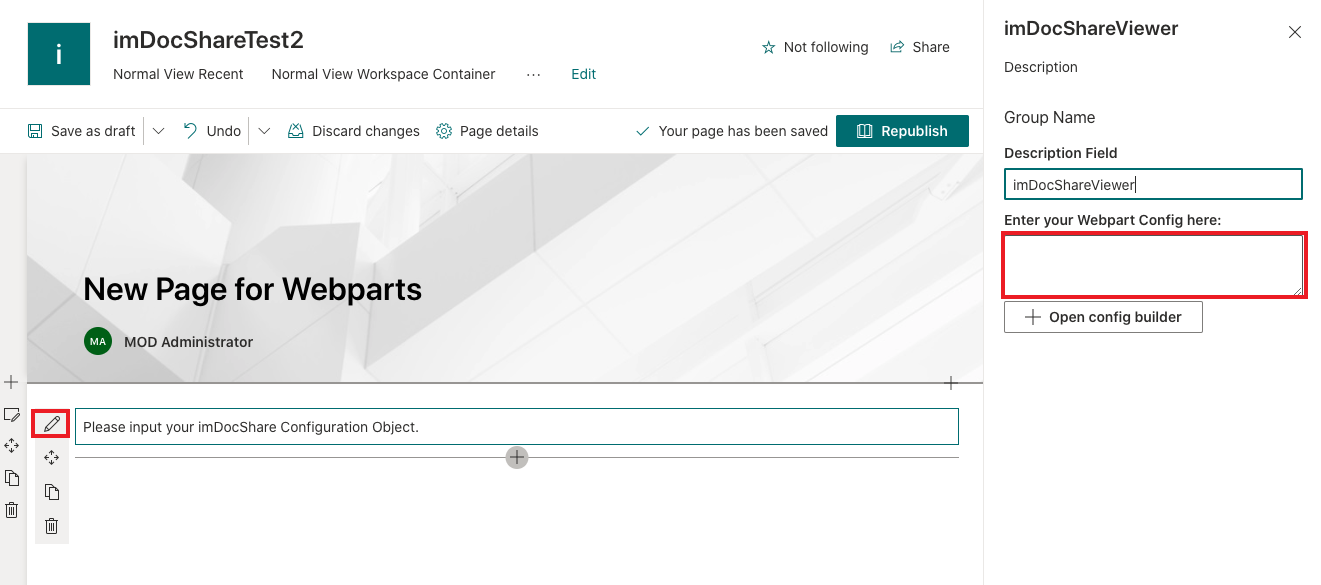
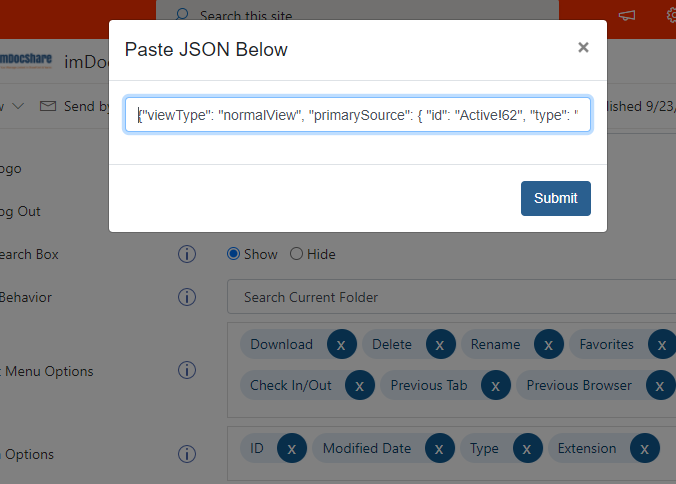
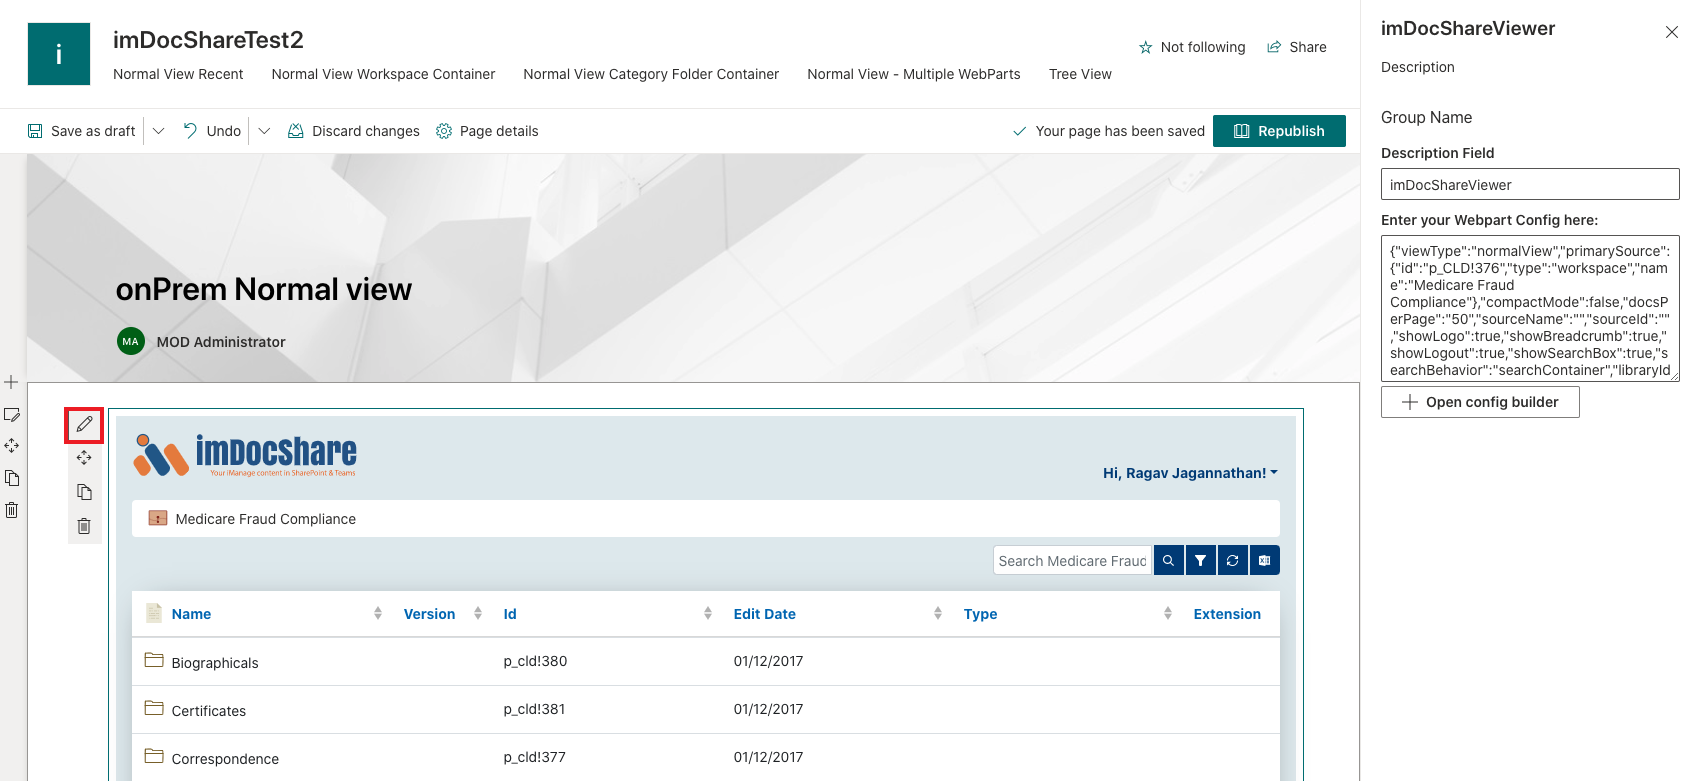
After choosing the IManageViewer webpart, click edit button and wait till right panel shows up. At this point, you will be able to tell whether the App has loaded successfully or not. If you see a message stating “Please input your iManage Configuration Object”, the webpart is ready to configure and use. If you see any other message, some part of the deployment has gone wrong. Please ensure that imDocShare has been deployed properly by seeing our Deployment Guide. Create the Config Builder webpart by pasting the following into the webpart configuration window on the right side:
{ “viewType”: “createConfig”,
“assetPath”: “{your asset path here}” }
The assetPath determines where the webpart will load its code and assets from. Typically, this can be found during the deploy process. Here is an example of a typical path we usually see in Sharepoint Online:
https://{your-tenant}.sharepoint.com/sites/AppCatalog/ClientSideAssets/{webpartGUID}/
For Sharepoint On-Premises, Your assetPath might look like:
https://{yourSharepointTenant}/SiteAssets/imDocShare/CDN/assets/images/folderIcons/
Again, more information about the Config Builder can be found in “How to use SP Config Builder.”
Authentication
imDocShare absolutely requires authentication with the iManage API service before any content can be returned to the user. This is a very important security step that cannot be bypassed. Only valid iManage account holders can see content from iManage through our application. Our application can use 3 different types of authentication for 3 different purposes:
- Standard OAuth with username and password screen from iManage (used for typical logins with a login screen)
- SAML Authentication (used when Single-Sign-On is enabled on the client environment)
- Password Grant OAuth with preset username and password (used for impersonation or custom login screen)
All of the above types of authentication use access and refresh tokens to persist the API session. The expiry values and other behaviors of these tokens can be customized and configured in your Application screen in the iManage Control Center.
Standard OAuth
Standard OAuth will present users with a typical login screen which comes straight from iManage itself.
Filling in the login screen will send a signal to the iManage servers which will validate your credentials and send back tokens which you can use to access the API. Token management is done using a KLST-hosted service app which will return tokens to you based on the redirect URL.
SAML Authentication
SAML authentication will only work if the client has the infrastructure set up to enable Single-Sign On with their identity provider. For example, Azure Active Directory services is typically used to tie the user’s Microsoft credentials to their iManage account. If your environment logs in automatically when visiting iManage on the web, SSO may already be enabled. Once this is set up, imDocShare will automatically leverage the same SSO system to login to iManage. A login popup will still appear for a split second but it should resolve on its own.
Password Grant OAuth
Password Grant OAuth is used in limited cases when impersonation needs to be used, such as impersonating an admin level service account or using a custom login screen in the case of iManage work web not being available.
To use Password Grant OAuth, please choose “custom Login” or impersonation in our config builder’s login options. Choosing the impersonation option will open up the username and password fields immediately, please enter your credentials here to activate automatic & impersonated login. Choosing the custom login option will replace the iManage login screen with our own login popup which will ask for username and password. All password fields in imDocShare are encrypted upon entry.
Tokens & Lifetimes
Access tokens have a limited lifespan. Users can customize the expiry for these tokens in the application screen on iManage:
If an API is made with an expired token, a 401 Unauthorized status is returned. imDocShare automatically processes expired tokens and attempts to retrieve a new token when required. For this, we use refresh tokens which last much longer.
This is different from a login lifetime when using iManage itself. iManage for security reasons will log out users automatically after 90 minutes of inactivity. As an iManage user, you can enable an automated login option if your organization has Microsoft Active Directory Services. In this case, you would then switch to using SAML-based authentication which will automatically log you in without asking for username and password.
Logout
Clicking on this will reveal a logout option which will remove the iManage session from the browser. Note: This will log you out of iManage in every tab of the current browser. The page will refresh automatically, and users must login to iManage before resuming usage.
Logging out from iManage can be done on a browser level. For example, if you log in to iManage.com in a browser tab and open a SharePoint page with imDocShare webparts in another tab, it will recognize that you are logged in and automatically retrieve tokens.
We also provide an optional method to log out from inside ImDocShare. The Config Builder contains a field called “Show Logout”. When enabled, this will include a dropdown menu on the top right side of the webpart which will display a greeting and the iManage user’s name:
imDocShare Document Viewer
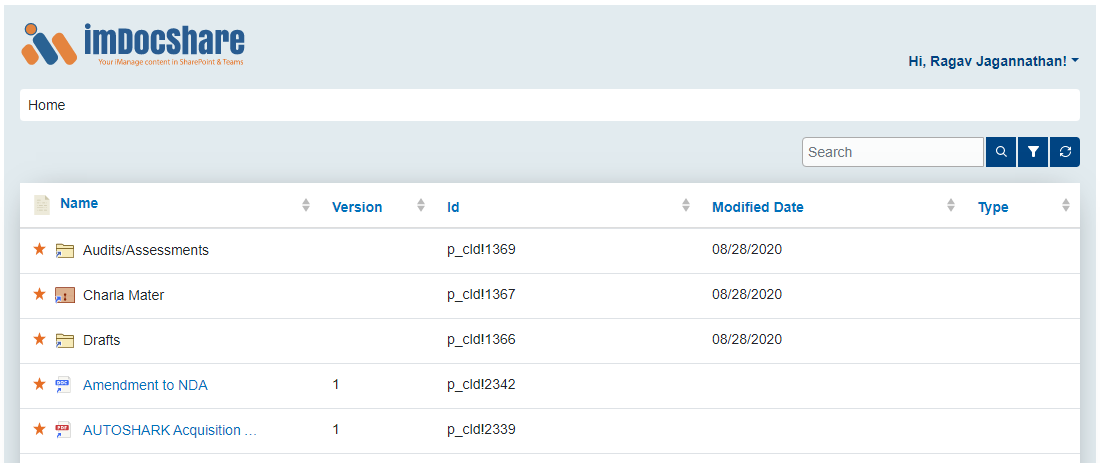
The document viewer WebPart is the core of our application. It comes out of the box with 3 varied and configurable viewtypes.
BreadCrumbs
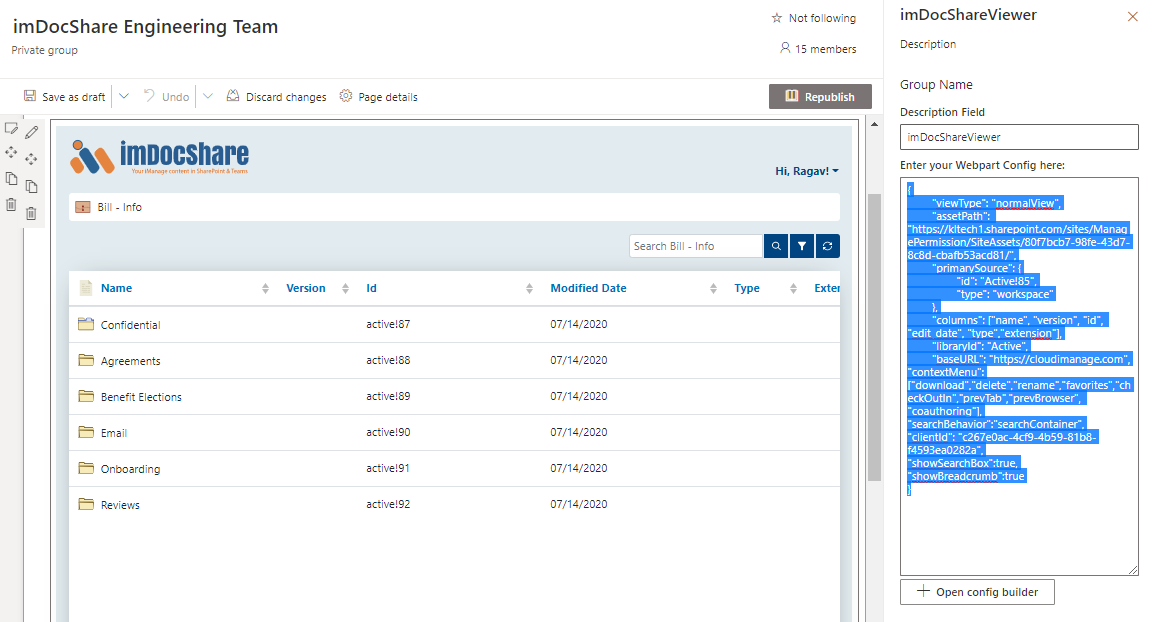
Normal View also makes use of a breadcrumb Trail which is a visual indicator which shows the received primary source as the “root” and when navigating through subfolders, creates a sequential list of containers that can be navigated back to at any point. In the above example, “Bill – Info” is the root source that is defined in the configs. The user in the example has navigated 5 levels deeper to find the document named “Contract 19342342” and they can click on any sub-container name to travel directly back to that container. Uploading a document while inside a sub-container will upload to the sub-container instead of the primary source.
Installation instructions
Viewtype: Normal View
{
“viewType“: “normalView”,
“primarySource“: { “id”: “ACTIVE!78”, “type”: “folder” },
“baseURL“: “https://cloudimanage.com”,
“columns“: [“name”, “version”, “id”, “edit_date”, “type”],
“contextMenu“: [“download”, “delete”, “rename”, “favorites”, “checkOutIn”, “prevTab”, “prevBrowser”, “coauthoring”],
“docsPerPage“: “50”,
“libraryId“: “Active”,
“showBreadcrumb“: true,
“showLogo“: true,
“showSearchBox“: true,
“showLogout“: true,
“searchBehavior”: “searchContainer”,
“assetPath“: “https://{your-tenant}.sharepoint.com/sites/AppCatalog/SiteAssets/80f7bcb7-98fe-43d7-8c8d-cbafb53acd81/”
}
For explanations of each property, what they do and what values should be used to change them, please see our Config Builder Properties Appendix at the end of the document.
Viewtype: Recent Doc
The Recent Doc viewtype is a different configuration of the Document Viewer Webpart that shows a collection of recent documents or workspaces that are derived from the individual user account of the iManage user. The only difference between a regular document viewer and RecentDocs lies in the configuration. RecentDoc has the simplest configuration as it does not require any sources or additional configuration. It simply shows the last 40 most recent documents based on the user’s account. This list will only be updated after edited documents have been checked in, or after they have been initially uploaded.
An example and explanation of the Recent Doc JSON Object is as follows:
{
“viewType“: “normalView”,
“primarySource“: “recent”,
“baseURL“: “https://cloudimanage.com”,
“columns“: [“name”, “version”, “id”, “edit_date”, “type”],
“contextMenu“: [“download”, “delete”, “rename”, “favorites”, “checkOutIn”, “prevTab”, “prevBrowser”, “coauthoring”],
“docsPerPage“: “50”,
“libraryId“: “Active”,
“showLogo“: true,
“showSearchBox“: true,
“showLogout“: true,
“searchBehavior”: “searchContainer”,
“assetPath“: “https://{your-tenant}.sharepoint.com/sites/AppCatalog/SiteAssets/80f7bcb7-98fe-43d7-8c8d-cbafb53acd81/”
}
For explanations of each property, what they do and what values should be used to change them, please see our Config Builder Properties Appendix at the end of the document.
Viewtype: Favorites
The Favorites viewtype is a different configuration of the Document Viewer Webpart that shows a collection of user-defined favorites that are derived from the account of the iManage user. The only difference between a regular document viewer and the Favorites view lies in the configuration and the configs for favorites is identical to Recent Docs except for the primary Source.
An example and explanation of the Favorites JSON Object is as follows:
{
“viewType“: “normalView”,
“primarySource“: “favorites”,
“baseURL“: “https://cloudimanage.com”,
“columns“: [“name”, “version”, “id”, “edit_date”, “type”],
“contextMenu“: [“download”, “delete”, “rename”, “favorites”, “checkOutIn”, “prevTab”, “prevBrowser”, “coauthoring”],
“libraryId“: “Active”,
“docsPerPage“: “50”,
“showLogo“: true,
“showSearchBox“: true,
“showLogout“: true,
“searchBehavior”: “searchContainer”,
“assetPath“: “https://{your-tenant}.sharepoint.com/sites/AppCatalog/SiteAssets/80f7bcb7-98fe-43d7-8c8d-cbafb53acd81/”
}
For explanations of each property, what they do and what values should be used to change them, please see our Config Builder Properties Appendix at the end of the document.
Viewtype: TreeView
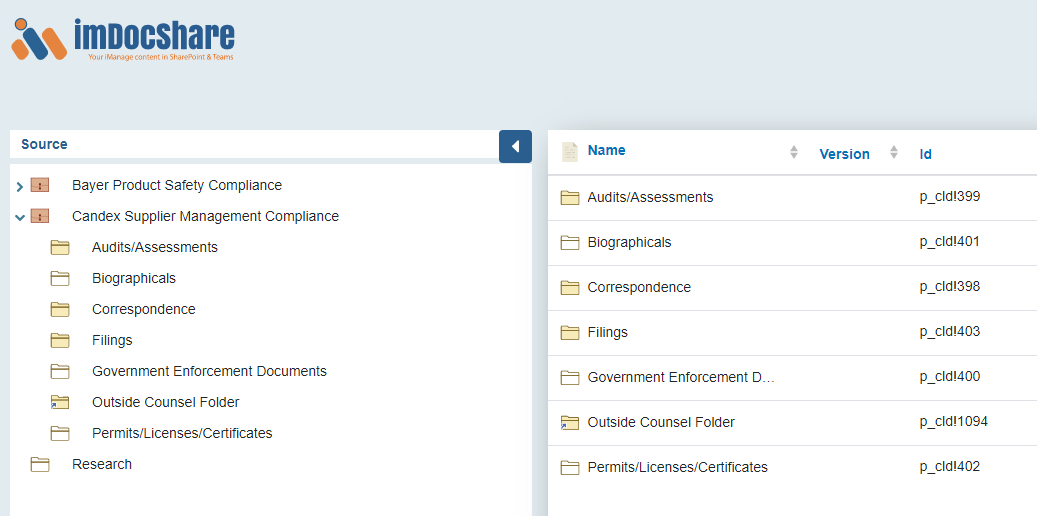
The Tree View WebPart shows a collection of container objects (folders and workspaces) on the left pane, with a corresponding document-viewer pane on the right. Subcontainer objects will unravel and be reveal in a tree-like structure on the left pane as the user clicks deeper into the directory. In this view, all containers will appear on the left side pane and only documents will appear on the right-side pane.
Installation instructions:
Much like the set-up process for Document Viewer and Recent Doc WebParts, you will add the imDocShare TreeView WebPart from the imDocShare WebParts group under the Categories gallery and configure its settings by entering an App Configuration JSON Object inside the Config Settings field, and then clicking Apply. An example and explanation of this TreeView JSON Object is as follows:
{
“viewType“: “treeView”,
“primarySource“:[{“id”:”ACTIVE!148″,”type”:”folder”},{“id”:”ACTIVE!150″,”type”:”folder”},{“id”:”Active!143″,”type”:”folder”},{“id”:”Active!187″,”type”:”folder”}],
“baseURL“: “https://cloudimanage.com”,
“columns“: [“name”, “version”, “id”, “edit_date”, “type”],
“contextMenu“: [“download”, “delete”, “rename”, “favorites”, “checkOutIn”, “prevTab”, “prevBrowser”, “coauthoring”],
“docsPerPage“: “50”,
“libraryId“: “Active”,
“showLogo“: true,
“showSearchBox“: true,
“showLogout“: true,
“searchBehavior”: “searchContainer”,
“assetPath“: “https://{your-tenant}.sharepoint.com/sites/AppCatalog/SiteAssets/80f7bcb7-98fe-43d7-8c8d-cbafb53acd81/”
}
For explanations of each property, what they do and what values should be used to change them, please see our Config Builder Properties Appendix at the end of the document.
Custom Columns
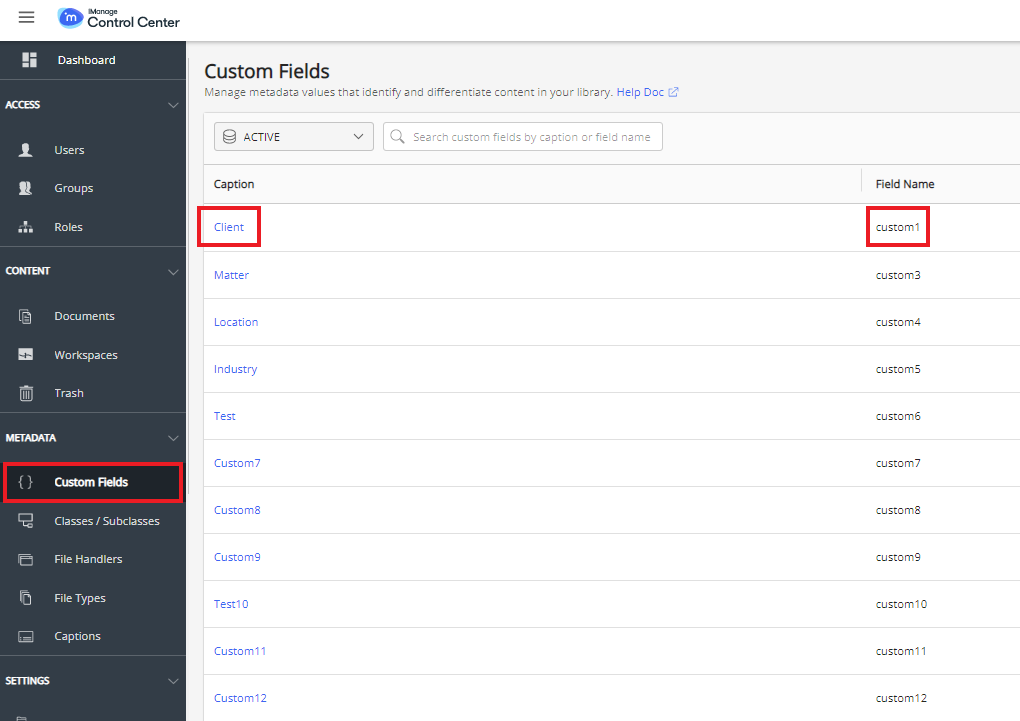
imDocShare also supports the insertion of custom column properties. In order to use custom properties, please visit your IManage tenant control center page, navigate to Custom Fields on the left hand side, where you will see the current list of created Custom Fields and their labels ‘captions’.
Note: If you are creating a brand new column, it may take some time for the data to populate properly. Please wait a few minutes after creating the Custom Field Attribute for the data to be correctly associated in the IManage API.
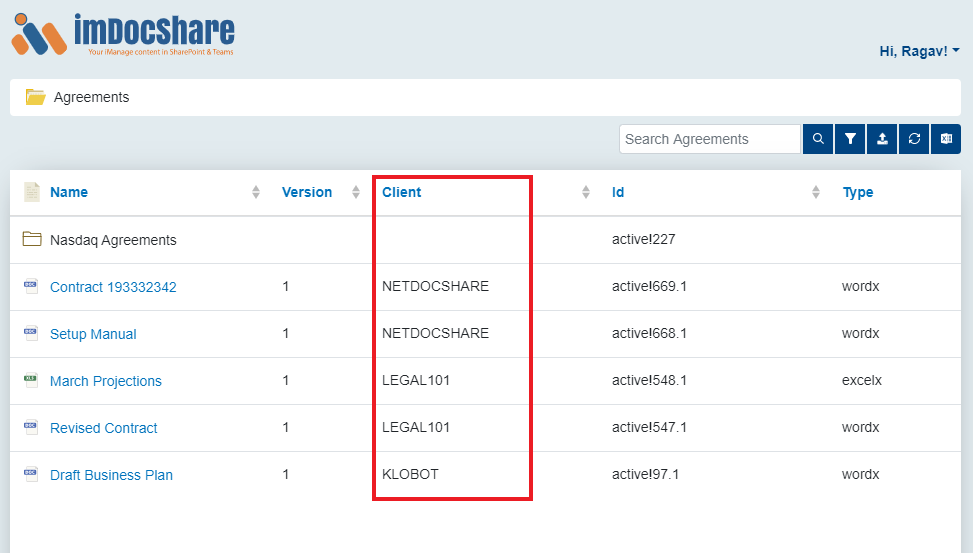
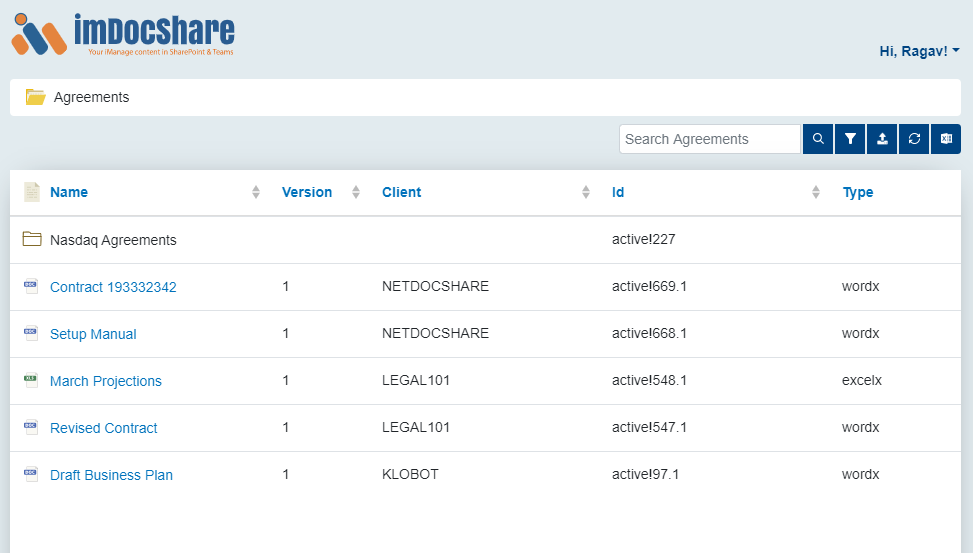
In the figure below, you can see the custom column “Client” has been implemented.
How to use SharePoint Config Builder
If the Config builder has not been created yet, the following steps will create one.
Create the Config Builder webpart by pasting
{ “viewType”: “createConfig”, “assetPath”: “your-asset-path-here” }
to IManageViewer webpart.
For more information on how to obtain your asset Path please see the Config Builder Properties Appendix.
The possible options include:
Normal View, Recent Documents, Favorite Documents, Tree View
The number of documents loaded during the page-based scrolling. The minimum is 1, and the maximum is 50. This does NOT affect the amount of results initially loaded. This is determined by the type of container and its contents.
An option to show or hide the large logo in the upper left-hand side of the screen.
An option to show or hide the option to Logout from the signed-in iManage account.
An option to be able to search through documents.
Search Container searches the currently viewed container, and all the sub-containers and files within that container for their metadata (Name, ID, Custom Field). Search All searches the entire container listed in the web-part regardless of the current view position, and all the sub-containers and files within that container for their metadata (Name, ID, Custom Field) and a search within the content of those files.
Choose to display the container path of the currently displayed container in the view
Choose to display the name of a container’s parent container in the tree-nav panel
The name of the container, obtained in iManage.com* or from our dropdown list on the Webpart.
Type of container. This can be a folder or a workspace
The desired columns displayed on the web part.
What options are available in the dropdown context menu for each file.
The URL where the assets and license key are stored for your application
Please refer to the Config Builder Properties Appendix to see a full list of config values and what options are available to fill them out.
Note: For Tree-View webpart creation, please don’t forget to press the “ + ” button next to fields such as Source Name or else the form will not register the input.
The ID of workspaces and / or Folders can be found by inspecting the following
Config builder also features automatic source querying when the user is logged into iManage. Your main library will already be chosen, once you have chosen a viewtype and source type, you will be able to see a dropdown of a selection of sources that match your parameters. If your source is not in this list, you can also search for it by name or ID.
Update imDocShare WebParts
Step-By-step instructions for how to update an existing Web Part:
- From the Home page in your SharePoint account, navigate to Site Contents on the left-hand side menu.

- Click Site Pages .

- Select the page in which you wish to edit the imDocShare Document Viewer Web Part. In the example below, we are selecting a “Test” page.

- Click Page in the upper left-hand corner.
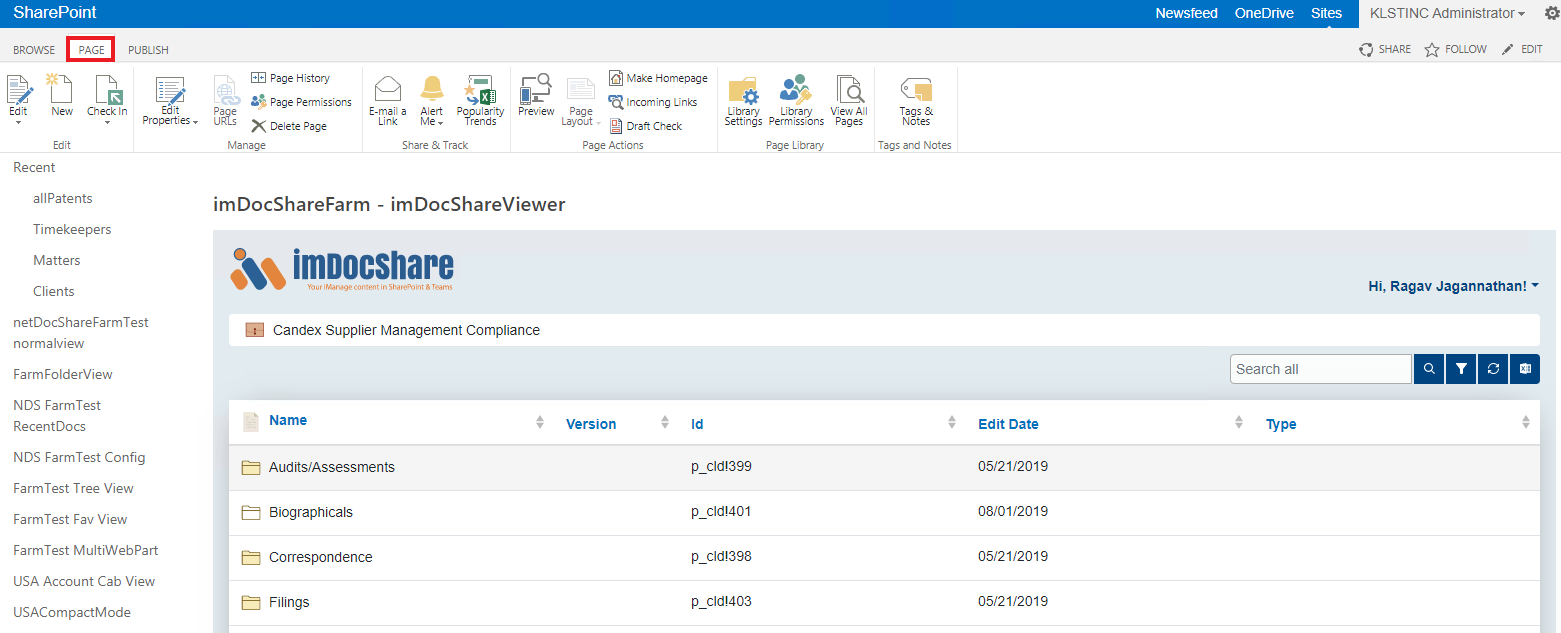
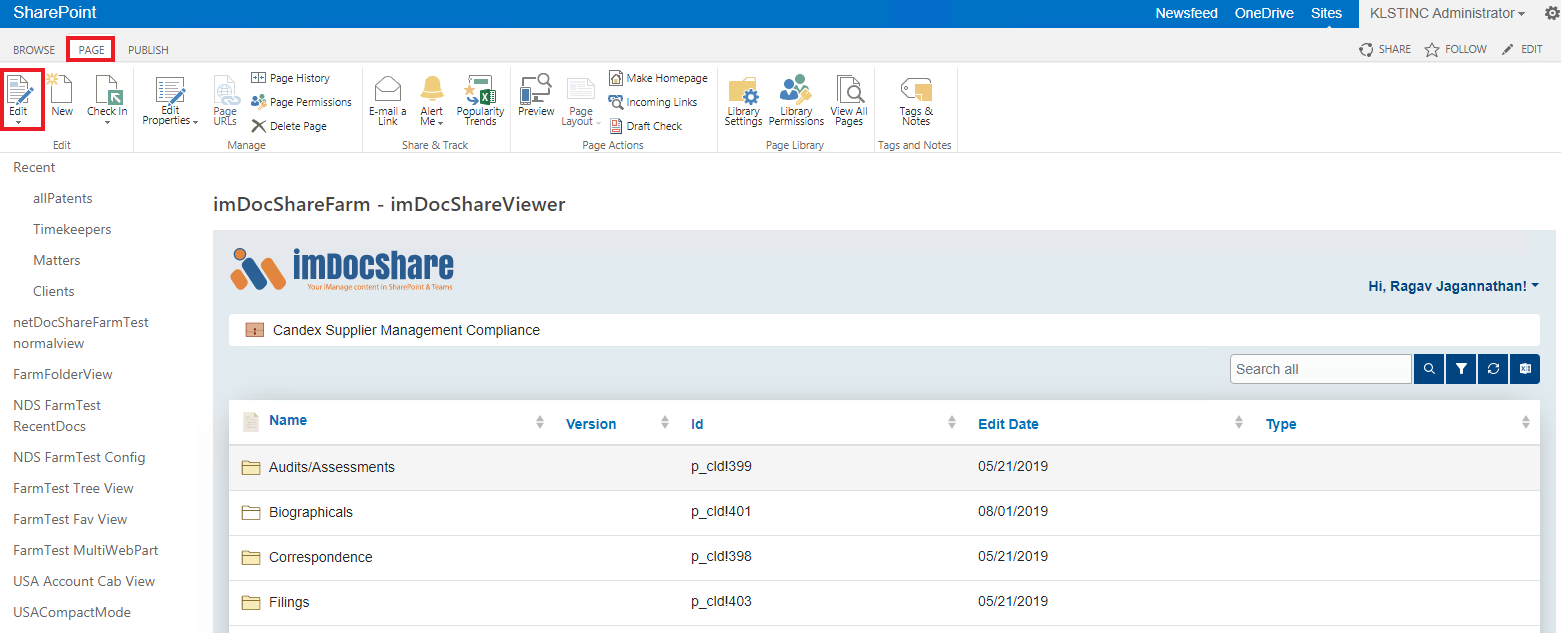
- Click Edit Page on the far left.
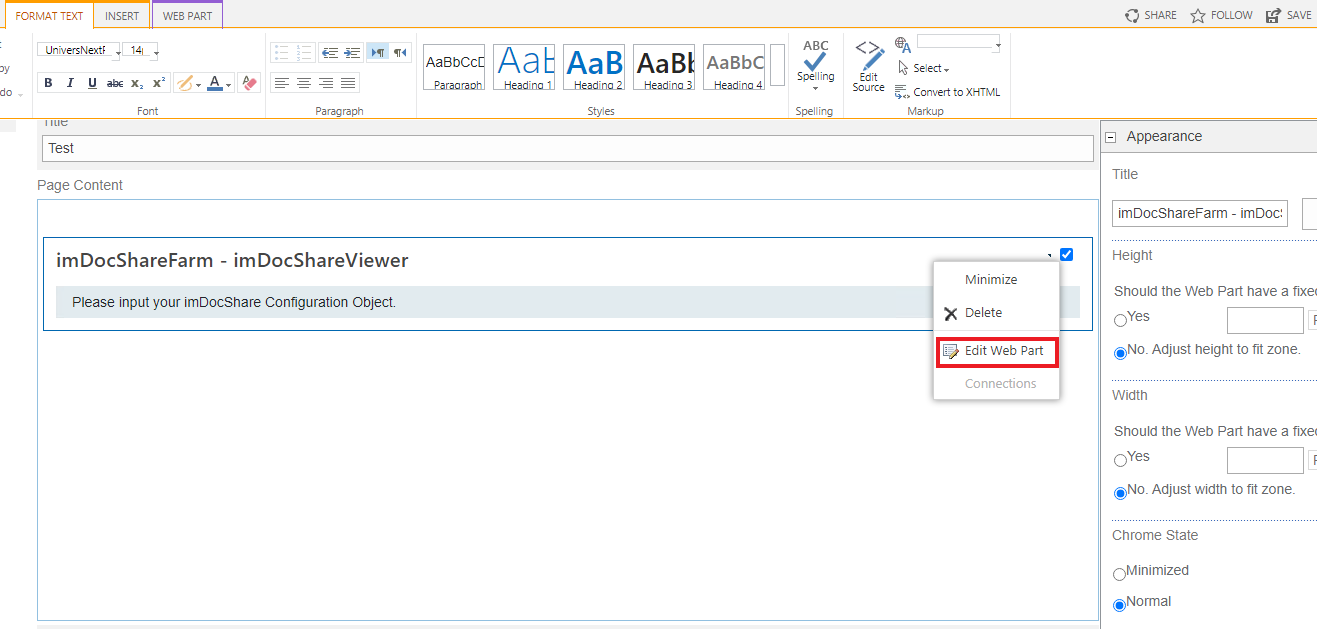
- Click the Web Part menu (small arrow in the upper right-hand corner) and then select Edit Web Part.
- Select Extended Settings at the bottom, and then select the ellipsis button to the right of the Config Settings field. Note: this feature only works in Internet Explorer browser.
If you are using a different browser, you can simply click inside the Config Settings field and paste the App-Configuration JSON Object directly.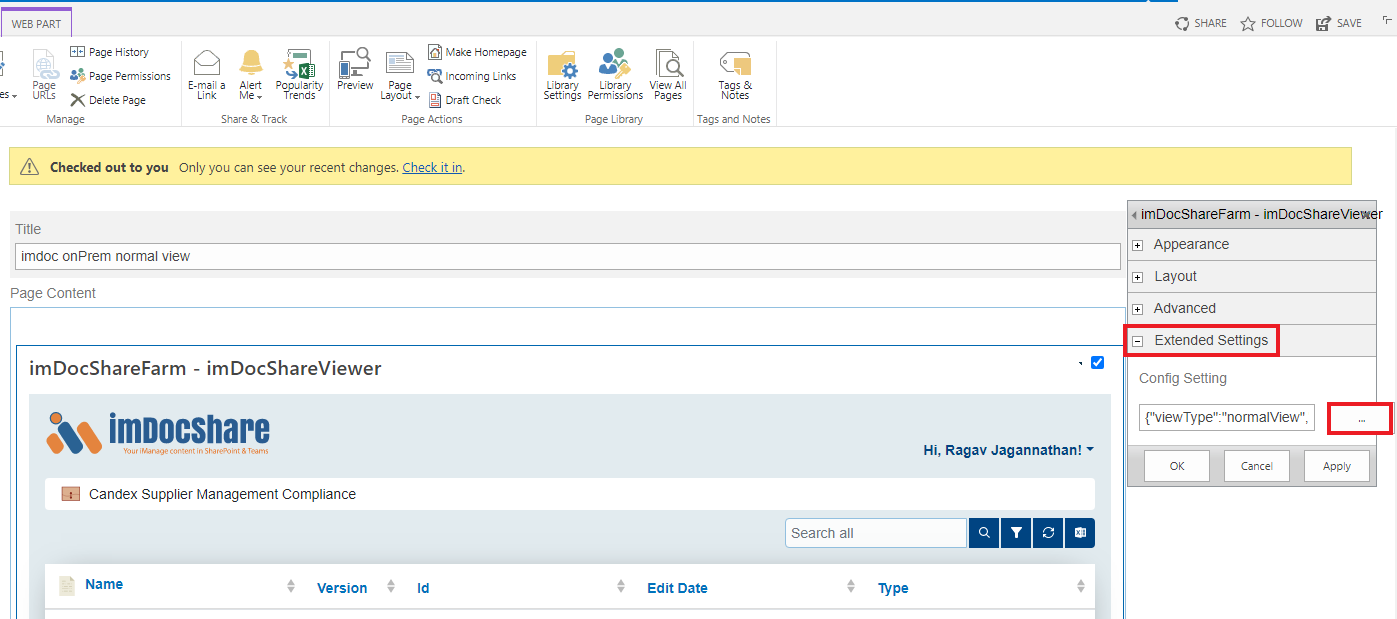
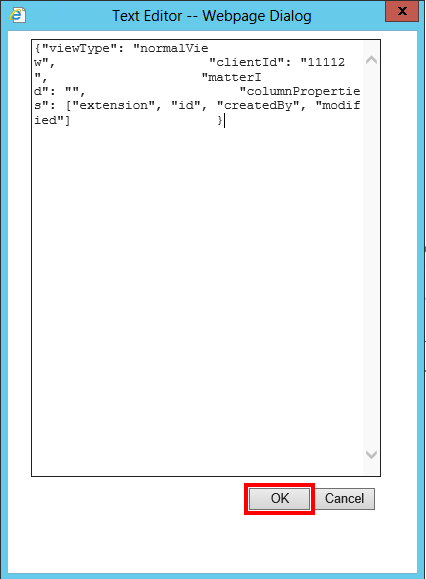
- Edit the App-Configuration Document Viewer JSON Object within the Text Editor – Webpage Dialog window, then click OK.
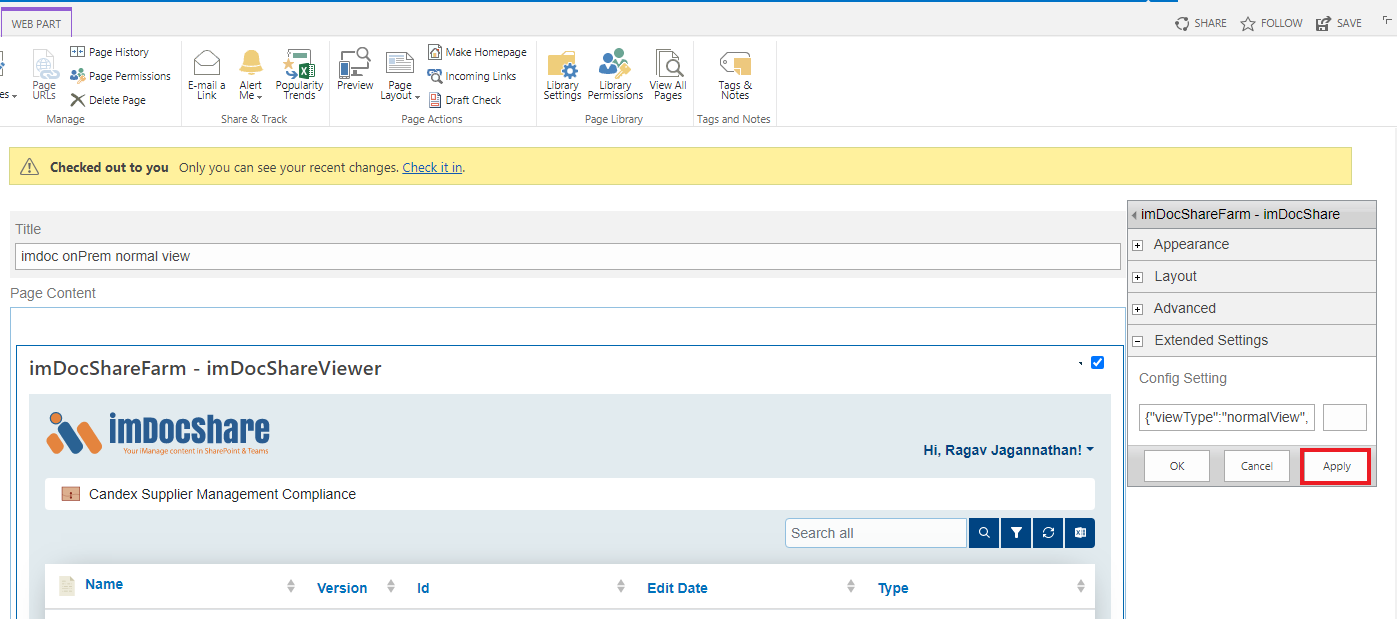
- Lastly click Apply.
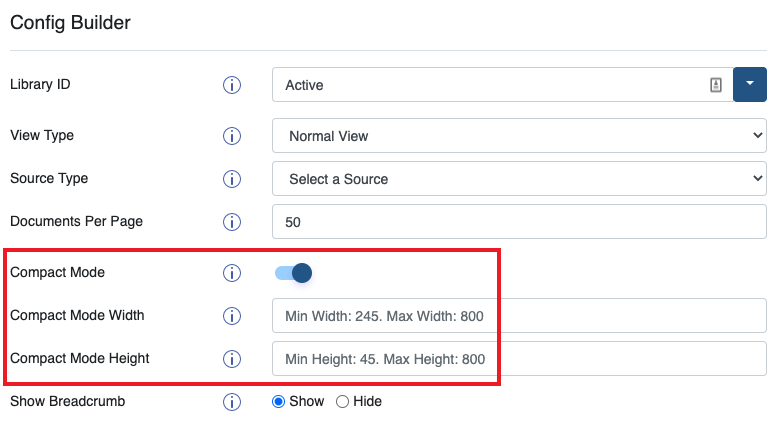
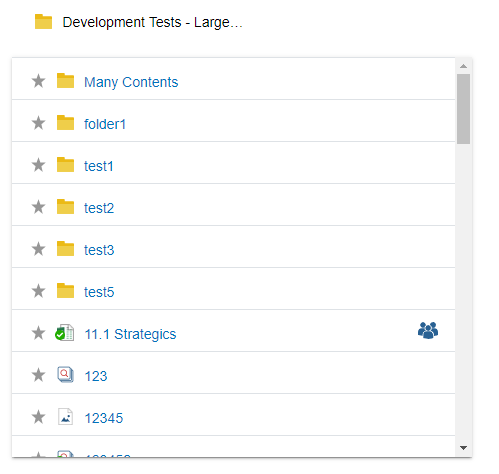
Additional Feature: Compact Mode
You can also enable compact mode from the Config Builder. This feature will enable the simplest form of imDocShare by only showing the list of files.
You can also modify the length and height of this table on Config Builder.
Classic vs Modern
Note: Make sure that the page created for the webpart is specifically a “webpart page” instead of “wiki page,” which is the default option. Clicking “new” to create a new page will default to wiki page. Working with webparts on a wiki page is possible, however, may cause unexpected issues.
Classic vs Modern
Note: Make sure that the page created for the webpart is specifically a “webpart page” instead of “wiki page,” which is the default option. Clicking “new” to create a new page will default to wiki page.
Config Builder Properties Appendix
ImDocShare uses a JSON-formatted config object to customize views and webparts to suit a user’s needs. Below you will find a list of properties and their possible values. All properties should be editable in a more user-friendly fashion by using the SharePoint Config Builder webpart, however, more technical users can also edit these properties manually in the JSON.
Base Properties
Base properties are fundamental requirements of each webpart. They often set baseline properties that are required for the webpart to work in the first place.
- viewType is the property that tells SharePoint which imDocShare WebPart to load. The available values are: ‘Normal View’, ‘Tree View’, ‘Recent’, and ‘Favorites’.
- assetPath is the full path where static assets are stored and must be obtained during deploy. This config is mandatory as it is also used to determine licensing information.
If you are in SharePoint online (currently included in the config above) your asset path may look like the following:
https://{yourSharepointTenant}/sites/AppCatalog/ClientSideAssets/23dea53d-fbee-49c3-8b16-c6b586b0422f/
If you are on Share Point on Prem Your asset Path might look like the following:
https://{yourSharepointTenant}/SiteAssets/imDocShare/CDN/assets/images/folderIcons/
Source Properties
Normal View can be configured to show a specific source container. TreeView can be configured to show several source containers. The ‘primarySource’ property is used to control this.
- primarySource is the container object that you would like DocumentViewer to display. primarySource is always required and can be a workspace, folder, ‘recent’, or ‘favorites’. In the case of a workspace, primarySource can look like
- “primarySource”: {“id”: “4112-9032-1392”, “type”: “workspace”}
- sources are always required in TreeView. sources should be an array of key-value pairs, where “id” is the id of the folder, and “type” should tell whether the object is a folder or workspace: “primarySource”:[{“id”:”ACTIVE!148″,”type”:”folder”},{“id”:”ACTIVE!150″,”type”:”folder”},{“id”:”Active!143″,”type”:”folder”},{“id”:”Active!187″,”type”:”folder”}],
Display Properties
columnProperties are a collection of iManage properties by which you would like to see and sort you’re the metadata of your content. The Document Viewer WebPart displays “name” as the first default document property to display, and in this example, “Ext“, “id“, “createdBy“, “modified” are the next four customizable document properties to display. ‘Ext’ or extension translates to “Document type,” “DocId” to “Document Id,” “createdBy” to “Pillsbury author,” and “modified” to “Date modified” as seen below:
ImDocShare also supports the insertion of custom column properties. In order to use custom properties, please visit your IManage control center, and make sure that the custom fields properties are enabled, then edit the Custom Field property on the desired container or file on your iManage tenant, and the property value will appear on your ImDocShare webpart.
Note: If you are creating a brand-new column, it may take some time for the data to populate properly. Please wait a few minutes after creating the Custom Field Propery for the data to be correctly associated in the IManage API.
In the figure below, you can see the custom column “Client” has been implemented.
- contextMenu determines what options will appear in the dropdown context menu that is opened from clicking the “…” button beside each document. The contextMenu can be disabled by completely removing the key and value from the config object. Users can add other options indicated in the list below:
- “download”,”delete”,”rename”,”favorites”,”checkOutIn”,”prevTab”,”prevBrowser”,”coauthoring”
- If you omit the values for “contextMenu”, our webpart will select all the options available. This can be changed by editing the JSON manually or picking the values from the corresponding dropdown menus in the config Builder. Please see an example of the context menu with all options turned on below:
Optional Display Properties
- showLogout is a property which control whether or not the welcome message on the top right appears. This message can be clicked to reveal a small dropdown containing the ‘logout’ option. The default value is false, Omitting this value will set the value to false. Note: On the Microsoft Teams implementation of our app, logout is required on every page, therefore this property is set to true and will not be editable by users
- showLogo is to show or hide the imDocShare logo image at the top left. Note: Image can be customized by replacing the file in the static images’ library.
Example: “showLogo” : true //Accepts Boolean
- For Normalview: showBreadCrumb is a property which hides or shows the bread crumb trail. A Breadcrumb trail allows you to navigate through multiple levels of nested folders.
- Click on any part of the breadcrumb trail to go back to that location.
Generate Client Id and Secret Id
App-Only Authentication:
App-Only is a model for setting up app principals. It can be used with SharePoint Online, as will SharePoint on-premises (SharePoint 2013 and above versions).
Steps:
- Navigate to SharePoint site (e.g., https://tenant.sharepoint.com)
- Open appregnew.aspx page (https://tenant.sharepoint.com/_layouts/15/appregnew.aspx).
Example:
https://m365x634254.sharepoint.com/_layouts/15/appregnew.aspx
- Click “Generate” button against Client Id row to generate a new client id.
- Click “Generate” button against Client secret row to generate a new client secret.
- Type any Title, which describes your app principal.
- Type App domain as www.localhost.com
- Specify redirect URI as https://www.localhost.com.
- Click Create.
- Note down the Client Id and Client Secret for future references.
Grant’s tenant scoped permissions to the newly created principal.
Steps:
Open SharePoint Tenant site with Tenant Administrator account (https://tenantname.sharepoint.com/_layouts/15/appinv.aspx, https://tenantname-admin.sharepoint.com/_layouts/15/appinv.aspx)
Example:
Online – https://m365x634254.sharepoint.com/_layouts/15/appinv.aspx
On Premises – http://klstsp16:2016/_layouts/15/ appinv.aspx
- In the App Id textbox type your generated Client Id
- Click the Lookup button
- In the Permission Request XML textbox type below xml,
<AppPermissionRequests AllowAppOnlyPolicy=”true”>
<AppPermissionRequest Scope=”http://sharepoint/content/tenant” Right=”FullControl”/> </AppPermissionRequests>
- Click Create button
- In the next dialog click Trust It button.
OneDrive Client ID and Secret Id Generation
Step 1: Please open the azure portal in browser https://portal.azure.com/#home

Step 2: Please click the “Azure Active Directory
Step 3: Once Azure Active Directory open after click the “App Registrations”

Step 4: Then Click the “New registration”

Step 5: Enter name for the application then click Register.

Step 6: Go to “API Permissions” on the left navigation and click on “Microsoft Graph” to open and update Request API permissions.

Step 7: Select and Update the following API / Permissions names for Microsoft Graph:
- Files.Read.All
- Files.ReadWrite.All
- Sites.FullControl.All
- Sites.Read.All
- Sites.ReadWrite.All
- User.Read
- User.Read.All
- User.ReadWrite.All
- Notes.Read.All
- Notes.ReadWrite.All
Then click, Grant admin consent for [Tenant Name]

Step 8: Go to “Certificates and secrets” on the left Navigation and click New client secret. Enter Description, Expiration and then Add.
IMPORTANT:
After adding new client secret, save both the Value and Secret ID generated. This is your only chance to save the value and is needed to connect OneDrive.

Step 9: Go to “Overview” in left navigation, take note of your Client and Tenant ID.

Step 10: Now you have the Client ID, Secret ID, Tenant ID generated and ready. This last step shows how to use the values to connect.
Open the imDocShare Sync Admin application, navigate to OneDrive and Add a connection.

OneDrive Tenant – Enter a name you would like to use
Tenant ID – Enter the Directory (tenant) ID noted from previous step
Client ID – Enter the Application (client) ID noted from previous step
Client Secret – Enter the Value generated from step 8 from adding new client secret


